It's a pretty straight forward, easy to follow tutorial. I would definitely recommend it if you have some extra time on the weekend. I loved looking through my fabric stash to find matching colors.
Showing posts with label softies. Show all posts
Wednesday, May 13, 2009
A Few More Baby Gifts...
It seems like every weekend this month I have another baby shower to go to. I always try to make something special and handmade for the Mom-to-be. While browsing Flickr the other day, I saw 
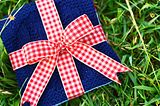
this tutorial and decided that it would make the perfect gift for a friend who's having a baby boy in July. I think the outcome was well worth all the cutting and sewing.
It's a pretty straight forward, easy to follow tutorial. I would definitely recommend it if you have some extra time on the weekend. I loved looking through my fabric stash to find matching colors.
You can't tell in the photos but I did add something extra to these adorable blocks. I picked up some round mesh jingle toys from the store and put them in the middle of the fiberfill when I stuffed them. Any baby will love the sounds they make when bounced on the floor.
I think I managed to finish everything in one evening while (not really) watching Disney's Cars in the living room with the kids.
I'm still working steadily on a few more cloth sets for this month. I might even be able to finish everything I hoped for. There's also a lot of exciting things happening around us. One being the fact that our new home will finally be finished next month and I get to pack up all of our belongings and move again. This time it will be permanent and that makes this Mommy very happy.
It's a pretty straight forward, easy to follow tutorial. I would definitely recommend it if you have some extra time on the weekend. I loved looking through my fabric stash to find matching colors.Monday, April 20, 2009
Fetch !...
While staring at my enormous stash last week all I could think to myself was, "What am I going to do with all this cotton?". It really is taking over the craft room and all the baskets that I keep my yarn in. I can't seem to resist the beautiful colors that our local stores carry. I will always knit dishcloths but what about the left overs that will never make up a whole cloth? I've had this idea in my head for quite some time now. I think I attempted making one about two years ago but with new babies and having to move it was left unfinished. Needing a break from the sweater I'm currently working on, I sat down and wrote up the pattern for everyone. My son and I had fun trying to come up with a name.
Everyone I know loves knitting for their pets. This is a fast and easy to follow pattern that uses simple increases and decreases then seaming up with mattress stitch. Great for a beginner that is looking to practice some shaping. I know I'll be making a few for Christmas this year. The pattern is also easily adaptable for larger dogs. Just add more stitches to the cast on areas and then increase the number of rows that you knit in plain stockingnet stitch for a longer bone.


Here's the pattern page on Ravelry!
Pattern: Fetch !
Needles: US Size #6, 4.0mm
Yarn: Lily's Sugar'n Cream
or any other kitchen cotton yarn.
Materials: Fiber fill or scrap yarn for stuffing,
Tapestry Needle
Strong yarn for seaming up.
( I used Patons Grace )
Scissor
Pattern: (Make 2)
CO 6sts
Row 1: K all sts
Row 2 (WS) and all even rows : P all sts
Row 3: Kfb, K4, Kfb (8 sts)
Break yarn and push sts back to end of needle.
CO 6sts on other needle.
Repeat rows 1-3 but don't break the yarn.
You should now have both pieces on one needle. Slide them together and P all sts (16 sts)
(*Tip: After purling the first 8 sts Grab the tail yarn (from the next piece) with the working yarn and P 1 st, this will secure it. Then drop the tail yarn and continue the row with working yarn. Be sure to treat that stitch as one on the next (RS) row.
Rows 7-10: (K one row, P one row) (2x)
Row 11: K1, SSK, K10, K2tog, K1
Row 13: K1, SSK, K8, K2tog, K1
Row 15: K1, SSK, K6, K2tog, K1
Row 17, K1, SSK, K4, K2tog, K1
Rows 19-30: (K one row, P one row) (6x)
Row 31: Kfb, K6, Kfb
Row 33: Kfb, K8, Kfb
Row 35: Kfb, K10, Kfb
Row 37: Kfb, K12, Kfb
Rows 39-42: (K one row, P one row) (2x)
Row 43: K1, SSK, K2, K2tog, K1, Turn work keeping remaining 8 sts on right needle
Row 44: Purl the 6 sts that were just worked.
Row 45: K 6 sts
Row 46: P 6 sts
Row 47: BO 6 sts, Break yarn.
Join yarn to remaining sts on (RS) and repeat rows 43-47.
Finishing:
Place both sides together wrong sides facing. With strong yarn thread tapestry needle and begin mattress stitching the sides and using a shoulder seam for joining the two halves together for the ends of the bone This video from Berroco might help if you get stuck. (I started seaming about half an inch down from the top right corner and continued counter-clockwise.) Once you have about 2" left begin stuffing the bone with fiberfill or scrap yarn. Finish seaming and secure ends. Pull thread through and cut with scissors from other side to hide it.
Here is a photo of how I used the Mattress Stitch to close the toy:

*A note about Fetch! and any other handmade toy that you use with your pets:
This toy is intended to be used only with owner's supervision. Do not leave your pet unattended with such toys because if ripped apart or damaged it could pose as a choking hazard. Check toy regularly for signs of wear and replace if necessary. (They're very fast to make!)
Fetch! © KrisKnits 2009
This pattern is for personal use only.

If you have any questions about this design or need help you can leave a comment or an email at kris@krisknits.com or on Ravelry via KristenKnits. I will try and help as best I can. I have been really swamped as of late and I apologize for any inconvenience. This week I'm cracking down to finish everything. Hope everyone is enjoying the better weather.
Here's the pattern page on Ravelry!
Pattern: Fetch !
Needles: US Size #6, 4.0mm
Yarn: Lily's Sugar'n Cream
or any other kitchen cotton yarn.
Materials: Fiber fill or scrap yarn for stuffing,
Tapestry Needle
Strong yarn for seaming up.
( I used Patons Grace )
Scissor
Pattern: (Make 2)
CO 6sts
Row 1: K all sts
Row 2 (WS) and all even rows : P all sts
Row 3: Kfb, K4, Kfb (8 sts)
Break yarn and push sts back to end of needle.
CO 6sts on other needle.
Repeat rows 1-3 but don't break the yarn.
You should now have both pieces on one needle. Slide them together and P all sts (16 sts)
(*Tip: After purling the first 8 sts Grab the tail yarn (from the next piece) with the working yarn and P 1 st, this will secure it. Then drop the tail yarn and continue the row with working yarn. Be sure to treat that stitch as one on the next (RS) row.
Rows 7-10: (K one row, P one row) (2x)
Row 11: K1, SSK, K10, K2tog, K1
Row 13: K1, SSK, K8, K2tog, K1
Row 15: K1, SSK, K6, K2tog, K1
Row 17, K1, SSK, K4, K2tog, K1
Rows 19-30: (K one row, P one row) (6x)
Row 31: Kfb, K6, Kfb
Row 33: Kfb, K8, Kfb
Row 35: Kfb, K10, Kfb
Row 37: Kfb, K12, Kfb
Rows 39-42: (K one row, P one row) (2x)
Row 43: K1, SSK, K2, K2tog, K1, Turn work keeping remaining 8 sts on right needle
Row 44: Purl the 6 sts that were just worked.
Row 45: K 6 sts
Row 46: P 6 sts
Row 47: BO 6 sts, Break yarn.
Join yarn to remaining sts on (RS) and repeat rows 43-47.
Finishing:
Place both sides together wrong sides facing. With strong yarn thread tapestry needle and begin mattress stitching the sides and using a shoulder seam for joining the two halves together for the ends of the bone This video from Berroco might help if you get stuck. (I started seaming about half an inch down from the top right corner and continued counter-clockwise.) Once you have about 2" left begin stuffing the bone with fiberfill or scrap yarn. Finish seaming and secure ends. Pull thread through and cut with scissors from other side to hide it.
Here is a photo of how I used the Mattress Stitch to close the toy:
*A note about Fetch! and any other handmade toy that you use with your pets:
This toy is intended to be used only with owner's supervision. Do not leave your pet unattended with such toys because if ripped apart or damaged it could pose as a choking hazard. Check toy regularly for signs of wear and replace if necessary. (They're very fast to make!)
Fetch! © KrisKnits 2009
This pattern is for personal use only.
If you have any questions about this design or need help you can leave a comment or an email at kris@krisknits.com or on Ravelry via KristenKnits. I will try and help as best I can. I have been really swamped as of late and I apologize for any inconvenience. This week I'm cracking down to finish everything. Hope everyone is enjoying the better weather.
Saturday, April 11, 2009
Organic Cotton Bunnies...
I finished these little guys the other day to put in the kids baskets along with the toys and candy they're getting from the Easter Bunny. I've had to hide them in the meantime so they don't hop off somewhere. The whole house has been buzzing today while everyone is getting ready for tomorrow. We're cooking, cleaning, baking and getting ready to paint some Easter eggs. Oh, and I have to shop for Ella's shoes later because she's outgrown her dressy ones. Hopefully the stores will still be open by the time I'm able to get out.

Here's the link to this project's Ravelry page!

For this particular pattern I followed the knitting instructions as written. The result was adorable, but I wanted the bunnies to be able to "stand". I took about 12 pennies and taped them together for a weight. Then I placed them on top of the stuffing before I seamed the bottoms closed. I added a pom pom, embroidered black eyes and swiss darned a pink nose. Now they are ready to play with each other tomorrow morning.


I should get back to cleaning now. I meant to post last night but we were all too exhausted by the time we got home from our friends house. Wishing everyone a happy and healthy Easter tomorrow!
Sunday, November 2, 2008
Belated Birthday Gift...
So my best friend's daughter has been asking me for a doll (With purple!) since her birthday. So many things have come in the way of free crafting these days. We moved earlier this year and I kept telling myself that I'll get around to it as soon as the dust settles. During the summer I started sewing again when Ella was finally sleeping through the night but I haven't really been consistent. My Internet went out the other night and I decided to take some time and fire it up again. Here we have "Bella" as Sarah named her. Having read the Twilight series I'm quite pleased with her choice of name. Maybe I'll make her an Edward. ;)

Just a simple and really fast pattern. I think start to finish it took me about an hour. I drafted out a doll pattern on paper, traced it on some fabric, pieced it together and sewed. Stuffed and wove in some hair. Embroidered the eyes and painted on the mouth, blush and eyebrows. Sarah was so thrilled and had to play with her hair.

On another note I'm excited to start teaching knitting classes at
A. C. Moore this Wednesday. There are youth and adult beginner as well as intermediate classes and workshops during the month of November. During December in addition there will also be a 2-part Intro to Sock Knitting class that I will also be teaching. I've taught knitting to friends and family for many years now. It's a great feeling to be able to share this craft with others.
Subscribe to:
Posts (Atom)


